Showing posts with label TUTORIAL. Show all posts

Friday, 18 March 2011

HOW TO CHANGE EYE'S COLOR BY PHOTOSHOP


I ever told you abot HOW TO MAKE SHARINGAN EYE right? but now i will teach you about how to change eye's color so you can change and change your eye's colour it gonna be up to you guys so it's will be feel funny so just follow those steps


1.open photoshop and browse your file (pict) to browse your pict you must click FILE===>OPEN
   and browse your file (as reminder: you just can browse a image that bright and good quality
  pict )   and i have my own pict here is it:


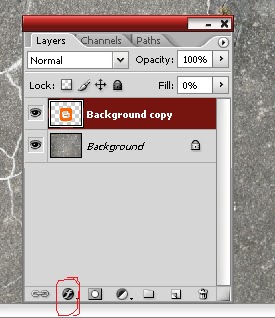
2.and than press CTRL+J and it will generate same layer pict that is the LAYER 1 like this:


3.at the tool bar click pen tool


4.and than set like this pict :


5.and than make line around the iris eye (Do not make the line too tight. Make a loose to be easy to tidy up the image) like this pict :


6.and than RIGHT CLICK at the line and than click MAKE SELECTION


7.and the line will be change into a selection line like this:


8.and than press CTRL+J  and it will generate that pict you have selecting like this: 


9. at the LAYER 2 click IMAGE ===> ADJUSTMENTS ====> HUE/SATURATION
and set your own color:


and than ERASE the outline of eye iris with ERASER TOOL choose the soft eraser (shoft mechanical)


and here is the result:


so,what do you think? nice right?

-LEAVE YOUR COMMENT-

Saturday, 12 March 2011

BASIC TUTORIAL OF PHOTOSHOP


Okay now our topic is about basic tutorial of photoshop maybe you realy don't know about the basic of  photoshop,now i will notfy you about it if you realy wan't to be can editing photo about photoshop,here is it..


A.tranparent
sometime you ever find this pict right?
do you know.what is it mean? it mean it's a transparent background,so if your pict has this pict (transparent) around the pict it mean around your pict is transparent you can direct the pict into other pict or other background

layer bar
layer is realy important in photoshop
what is the usage of layer? if you want to add brush,add pict and ect you must add a new layer it make you easier to erase or remove the pict or brush.how to add a new layer?
click a icon like a paper beside the trash icon


tool


photoshop have many tool
there are move tool,marquee tool,magic wand tool,corp tool,slice tool and ect,both of them have different usage and it REALY important for photoshop


yeah that's all you must to understand if you wan't to practise editing photo


-leave your comment -

Wednesday, 9 March 2011

HOW TO MAKE DIFFERENT COLOR OF WATERMELON (photoshop)


Alright what is our tpoic today? i will answer it!
all photoshop photo editing can be done in terms of color, detail, uniqueness ..
all are able to with photoshop. so this topic is edit pictures "watermelon" with a unique and different color .. how? sounded good right? so .. how to do it? ..
Is this difficult?
Is this complicated?
this time it is very easy and simple friend. do not believe? try it


1. open photoshop software and than open the picture(file==>open and browse the pict) , now i have my own watermelon 


2.just press CTRL+J and it will have two same layers like this:


and then in the layer 1 click IMAGE===> ADJUSTMENT===>HUE/SATUTRATION ind it will look like:


you can change the :EDIT,HUE,SATURATION and LIGHTNESS up to you but i will change it into purple 
colour LIKE THIS:


so if the background color is change you can erase that with ERASER tool at the LAYER 1


so what do you think? simple and look great right?


please leave your comment!!

Sunday, 6 March 2011

HOW TO MAKE ROCK BLOGGER LOGO(photoshop)

hi my visitors how are you today? i hope you alright so maybe you have no idea for make a blogger logo.. so i want to share you about "HOW TO MAKE ROCK BLOGGER LOGO" i hope you like it and you will practice it into your phhotoshop hehe so let's check this out

prepare this pict:


and then the 2nd step
 press ctrl+J and it will have 2 same layer delete the background layer (drag background layer into trash)
cut the blogger's logo (the white part)
 with magic wand tool (click into white part and press del to corp the white part) to unmark the selection line press ctrl+d and here is the result:


and then drag the blogger logo that you have corp the white part so drag the blogger logo into the wall pict with move toll (toll like a cursor) and resize it (ctrl+T)
like this:


in the layer 1 change the fill into 0%


and than click blending option (look at picture below)


and than thick drop shadow
distance=25
spread  =21
size       =128


and here is the result:
simple right?


please comment!!

Thursday, 3 March 2011

HOW TO MAKE GAARA STYLE (PHOTOSHOP)


a long time not post about tutorial,whamp! now i got the idea the new post about gaara style,do you know gaara? i think you're certainly know gaara at anime naruto the most popular anime and manga by masashi kishimoto the famous mangaka.. so look at the picture above,an kanji at his left forehead so wan't to editing photo like this one? just follow the steps it's so easy


-the first-
prepare your pict and gaara's kanji
example pict
KANJI

 -the second step-
 
open photoshop software and then open your pict and the kanji
(file ====> open) and browse your pict and kanji look at the picture above


-the third step-

 
click kanji pict press CTRL+J then delete the background layer
(drag bacground layer to trash picture in the layer bar)


-the fourth step-
and then click magic wand tool
and make selection  with method click the white area and press delete(look at the pict above) until like this picture
to unmark the selection line like a dashed line press CTRL+D


<===selecton progress


here is the result:


-the fifth step-
so the next lets drag the kanji to the man pict,maybe the kanji will more biger than man pic so to resize the kanji text please press CRTL+T or Edit ====> free transform
and move the kanji into man's forehead with move tool (tool that seem like cursor mouse)
and here is the result:


and then change the mode from normal to overaly


so here is the result


so the kanji is finish so do you feel like gaara?

just try it,dont forget to leave your comment if you're noy understand i will learn you n_n

Wednesday, 9 February 2011

SHOCKED EFFECT (Photoshop)


 ok my blog's topic now is about shocking effect,you know that in a manga(japan comics)sometime in that comic have a shocked situation right? like that pict


ok just follow this steps it's so simple..


1.open photosop program and open your image (menu file----->open and browse your pict)
this pict for the exapmple


2.and then duplicate the layer press Crtl+J (hold the Ctrl),and then it will be 2 pieces with a same picture of the same layer


3.in the layer one click FILTER--->BLUR----->RADIAL BLUR,in the blur method click zoom and the amount is up to you and i will choose 45 amount for the example
and here is the result

4.click eraser tool and right click chhose the soft mechanical erraser effect
then erase the naruto pict.


5.finish and save it
and here is the result

(as a reminder: Crtl+Alt+Z to undo)

Sunday, 6 February 2011

How to make sharingan eye (photoshop)


do you ever think to make your own sharingan eye?
your dreams will Fulfilled with Photoshop, how very simple and easy, so follow these steps

let's check this out:

1.the first you must prepare the material
  eye


and the sharingan eye


2.open photoshop,and open those materials (eye and sharingan eye)
  File==>open and choose those material


3.then drag the image to the image sharingan eye(draging just can work with move tool)move tool is similiar a cursor icon.You have to put sharingan circle, right in the eyeball (look at the picture below)


4.change the layer 1 mode(red line) into OVERALY


then here is the result:


5.delete unnecessary sections in layer 1 with shoft mechanical eraser mode to choose the soft mechanical 
right click in the picture (reminder:right click with eraser tool) and choose the soft mechanical eraser mode
and here is the result:

6.to create a nice blend of colors click image menu==>adjustments===>hue/saturation at layer 1
  and make the color real,here is the result


and the end of those step ,click the burn tool and averaged on the edges of the eyeball sharingan or background layer

and make the real sharingan 


finish and save it!


(sorry if the result is ugly, you can make it by your own creativity)


I HOPE IT USEFUL
Related Posts Plugin for WordPress, Blogger...